One of the nice things about our house compared to the old one, is the cat flap we have in the back door from the utility room. At our old house, we had to constantly open the back door for our two cats to go in and out multiple times every day and it also meant that they were then kept indoors overnight. But with the cat flap, the cats are a lot more independent and can let themselves out whenever they want! In theory…

Our two boy cats are not particularly bright however, and it took some persuading and encouragement to get them to understand the principle of the cat flap. We had to hold the cat flap open for quite a while so the boys could build up their courage and investigate. It ended up with them sticking their heads into the hole so they could sniff the world outside but not much else. We had to then try and encourage them to put their paws up and then squeeze the rest of their bodies through. Not an easy idea when you have a confused and stubborn cat armed with sharp claws!
But we were successful and the boys both managed to go through several times from both directions, having got the hang of it eventually. But that also identified a rather significant size different between our cats and the cat that used to live here – our boys are much smaller! So to address this size difference and make it easier for the boys to actually be able to get up to the cat flap, I sat down and designed a basic set of mini-steps to go inside the door in the utility room, to assist the boys getting out and back in again. And that way, the door can still open outwards without the steps getting in the way.
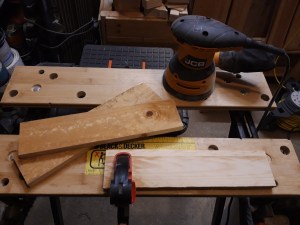
I searched through my scrap wood collection (I really need to figure out a more efficient way to store wood!) and found some pallet wood slats and some left over pieces of 2 x 4s from building my mitre saw bench previously. As the boys are going to be walking on this multiple times a day, I made sure to check the slats didn’t contain any nails, staples or anything sharp. I cut the pieces to length with the mitre saw and then sanded all the pallet slats on both sides to smooth them out and soften the surface for paws.
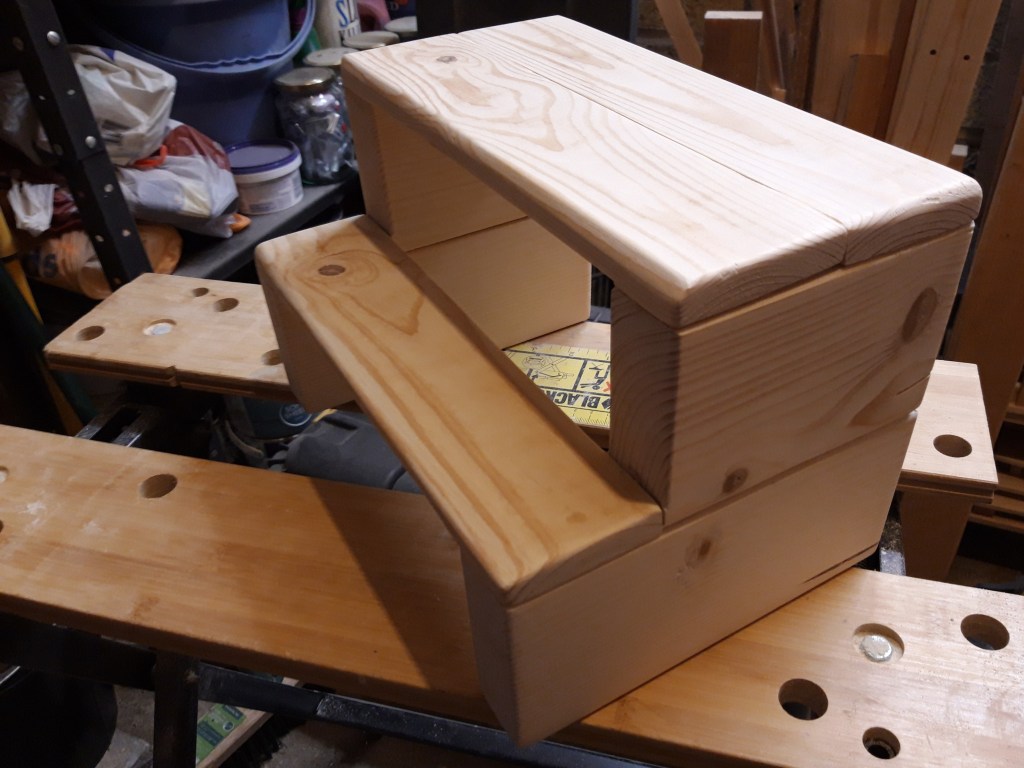
I designed the steps to have a small front step and a larger second step in the form of a platform, so the cats could stand on the top section with all four paws. This means they have a bit more space to position themselves successfully for launching through the cat flap if needed!
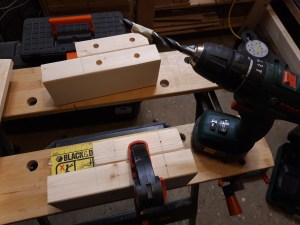
To make the main structure of the steps, I measured and cut two sections from the 2×4 scrap pieces and marked equivalent points for putting dowels on both pieces to more securely hold them together. I decided to use dowels over other fastening methods as was simple and easy to do, and ensured the pieces were held together as the glue dried preventing any movement. I made small holes in each piece of 2×4, putting tape on my drill bit to make sure I didn’t make the holes too deep.
This worked really well although I have seen some metal collars you can tighten onto a drill bit to physically prevent you being able to drill any deeper into the wood. I will have to put them onto a Christmas or birthday list perhaps!

I already had a short length of dowel the right diameter, so I doubled the depth of the holes I had drilled and measured that distance from the end of the dowel. I used my bench hook jig to hold the dowel in place while I cut it with a hand saw and then sanded the ends to remove the little bits of chip out. The bench hook is a quick jig I made out of some mdf and a couple of scrap pieces of wood, but I have ended up using it quite a lot for when I need to make smaller cuts- a situation where the cut off piece would be easily lost using power tools.

Once I had all the pieces of dowel cut to the right length, I applied some glue into the dowel holes, being careful not to add too much to avoid splitting the wood from the pressure of inserting the dowels. I added the dowels into the holes and put glue along the edge grain sections of the 2x4s, putting them together and pressing them down. I then loosely positioned the pallet slats on top of the 2x4s to check the dimensions were correct and the steps were suitably proportioned.
As I was happy with the dry fit, I removed the pallet slats and applied glue to the surfaces that would make contact, including between the two slats on the larger top platform section. I clamped those two slats together and then used clamps and weights to try and secure the rest of the project in place for the glue to dry. Clamps are a vital part of my workshop and although it’s a woodworking cliché, you can never have enough clamps! I need to add several different types of clamps to my wish list for various upcoming projects I have planned, especially longer clamps so I can hold larger projects still while I work on them or to keep a larger workpiece in place while the glue in a joint dries.

I wiped off as much excess glue as I could while I was gluing up and then once the glue had dried, I removed any squeeze out I had missed using a chisel. I noticed at that point that all the edges of the steps were very sharp angles, so I grabbed the sandpaper again and rounded over all the edges. This is not only practical for the boys to use but it makes the steps slightly softer to look at as they are a bit less rugged-looking.
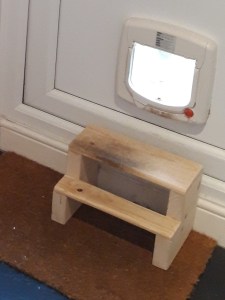
Once I had finished the final all over sand and I was sure the glue was fully dried, I brought the set of steps into the house. I decided not to use any finish on the workpiece so I could put them in place faster and give more time for the cats to get used to using them before they had established any kind of a routine for using the cat flap. Also, as the boys lick themselves clean, I was a little worried about them picking up a stain or finish, particularly if they come inside with wet paws. So I decided to simply leave the wood sanded smooth and untreated – that way if the wood gets very muddy, I can simply clean it and sand it down again, or if it gets very wet I can just replace individual steps if needed. And so far, the steps have been a fantastic success!
The boys have been using them for a while now quite happily and it makes it much easier for them to get out (and back in!) through the cat flap.
Plus the steps are also small enough to not get in the way for us and we can still walk past them while they are in position when we open the back door too. So overall, a purrrrfect project! 🔨
