As part of the plan for my workshop I want to build a large sturdy workbench with a vice to replace my current temporary workmate-style folding workbench. And I want to be able to sit at the bench for doing some tasks so I am not always on my feet in the workshop.
To that end, I looked into different designs for shop stools and found a really good one by Steve from Woodworking for Mere Mortals, which is not only pretty much exactly what I want, but is also a good way to learn new skills including half lap joinery and tenons.
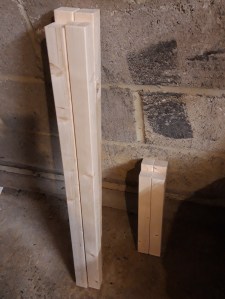
I started by sourcing some 2x2s from the local B&Q DIY store and then cut them to length. In Steve’s video he uses 2x4s and rips them to size, but I used 2x2s to save me this step, as I haven’t got a table saw yet! I measured the 2x2s to get the right lengths for the legs and the eight cross braces; four at the top of the stool, and four around the lower part of the legs to rest your feet on. I measured out the distance for the legs and then used a stop block on my mitre saw bench to allow to make four identical pieces for the legs using my mitre saw. I then repeated this for the eight cross braces, as they are all the same length, despite differences in the half lap joinery at the top and bottom of the stool. I then started making the half laps on the lower cross braces, as they were simply half the width of the 2×2 deep and the full width of a 2×2 long. I made a series of cuts by hand and then used a chisel to remove the wood and smooth the surface. This would have been much quicker to do with a table saw, as Steve demonstrates in his video, but I am quite pleased that I was able to accomplish the same task by hand (although naturally it took a lot longer!).
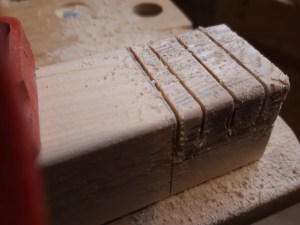
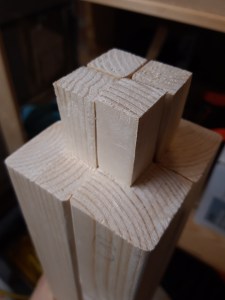
I made identical half laps on each end of the lower cross braces and then moved on to the upper cross braces. These were more complicated as one end had the same half lap as the lower cross braces – half the width of a 2×2 in depth and full 2×2 width in length – while the other end differed. This end was half the length of the other end, equally only half the 2×2 width in length. If that sounds confusing, it might be clearer in the picture!
But when I had finished, I had four identical lower cross braces with identical half laps on each end, and four identical upper cross braces with one half lap being twice the length of the one on the other end of each piece. I could then turn my attention to the legs, which is where the real complications started!
The legs needed notches cut into the lower section to allow the half laps from the lower cross braces to slot into. However these needed to be staggered on each side so the cross braces didn’t get in the way of each other. It would have been possible to make these the same way as the upper cross braces and have all four lower cross braces at the same height, but this way it means there are two different heights of cross brace to rest your feet on – which is very helpful if you’re adjusting position or different sized people are going to be sitting on it!
In order to keep track of which leg needed the notch cut into what side, I divided the legs into two pairs labelled A and B. That meant I could ensure I cut the upper and lower notches into the correct side on each pair. And that really helped me to visualise what the final workpiece was going to look like too! I cut the notches out in the same way I did the half laps on the cross braces, sawing multiple lines into the section to be removed and then using a chisel to remove the waste and sharpen up the edges and base of the notch. I repeated this to make both notches on each leg, testing the width of the notch with the already completed lower cross braces to make sure the fit was nice and snug. Sometimes processed wood can vary quite a bit in width from one piece to the next, and as I cut the pieces for this workpiece out of two different 2x2s, I took the time to pair each cross brace with a notch in the legs so as to make each joint a nice snug fit.
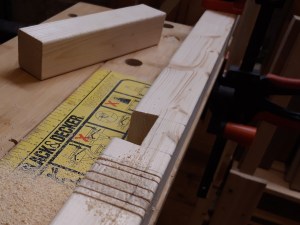
Once I was happy with the lower cross braces and the notches in the legs, I measured out and marked where to cut tenons into the top of the legs. This was also quite tricky to figure out and would have been quite a pain if I got it wrong – the tenons are on the inside of each leg post, so I had to figure out how the notches for the lower cross braces needed to be arranged and mark the top of the legs accordingly. By repeatedly checking and trying to visualise the finished stool in my head, I managed to get it right and cut out four tenons into the four legs correctly, using the same techniques as for making the cross laps. I took care to not use too much force on the tenons on the legs so as to not split the wood and made sure to use a sharp chisel to clear the waste wood away and smooth the sides of the tenon. I stood all the legs up together to check the finished tenons before I moved onto the assembly phase!
Gluing up in sections 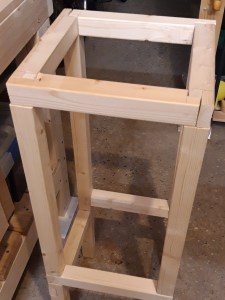
Alternating upper cross braces
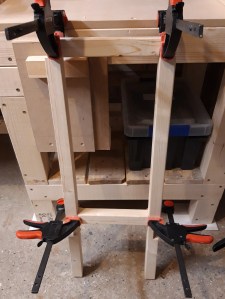
When I make more complex projects, like this one, I often do a dry fit of the various pieces to make sure that I haven’t missed a piece or made a cut in the wrong place. And that is usually the time I feel like I don’t have enough hands! Pleasingly everything had gone as planned and I had all the pieces, half laps, tenons and notches cut in the right places on the right pieces. I therefore started the glue up process, which I decided to do in stages due to not having a large enough workbench (yet!) to do the whole thing in one go. And this also meant I could secure the pieces in place with my clamps while the glue dried. As my projects get larger in size and complexity, I think I need to add more clamps to my shopping list!
I glued up two opposite sides and clamped them in place while the glue dried. I then added the top and bottom cross braces between the two already glued pieces and clamped those in place. I was given a band clamp as a birthday present last year, so I put that to good use to hold the top cross braces in place. These cross braces alternate around the top of the legs of the stool, with one end being overlapped by the longer section of the next cross brace round, so I wanted to make sure I was apply even pressure to all of the pieces.
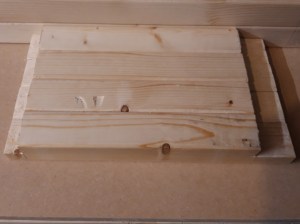
While I waited for the glue to dry, I searched my scrap wood collection for a suitable top for the stool. Steve uses several planks glued together to make a top surface but I found a couple of scrap pieces of about the right size when put together. I cut them to the right approximate width and then sanded the top surface thoroughly, rounding over the edges to make them less sharp for sitting on. As this is just a workshop project I am quite happy for the stool to not look completely perfect, so the slight notches in the scrap wood top surfaces are just a feature really!
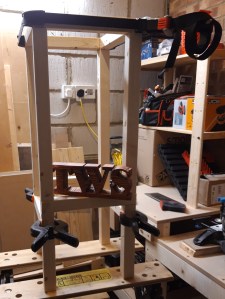
Once the glue in the leg half lap joints was fully dry I then fitted the top to the stool by laying the top surface upside down on my folding workbench and turning the legs upside down on top of that. I marked out the exact size of seat surface I needed and cut the board to the right dimensions using a hand saw. Another alternative would be to use a router with a straight bit with a bearing to run along the upper cross braces on each side. Another thing for my tool list!

The finished stool 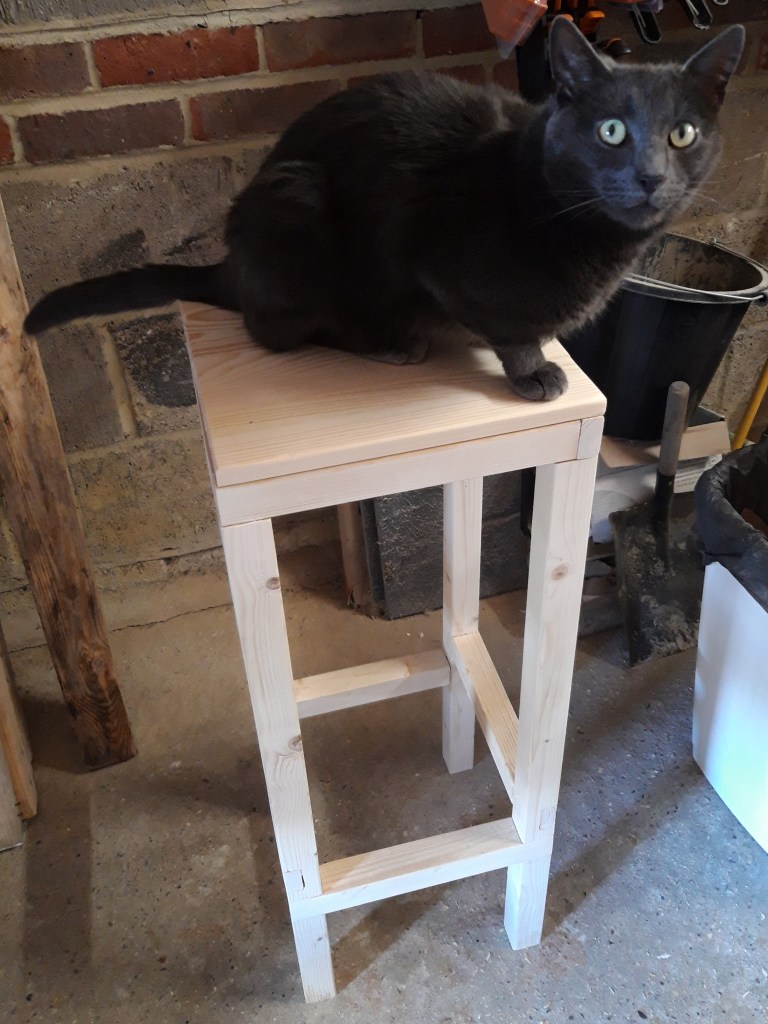
The stool has Nifty’s approval!
I then applied glued, turned the stool the correct way up again and put some weight on top while the glue dried. I left the glue to finish drying overnight and the following day the stool was ready to use – as Nifty quite happily demonstrated! 🔨
